https://www.youtube.com/watch?v=51YtxSH-U3Y&list=PLQY2H8rRoyvzuJw20FG82Lgm2SZjTdIXU&index=7
최근 텐서플로우는 파이토치 때문에 연구에는 불편하다는 인식이 있습니다(개인적인 의견일 수도..).
이번 영상에서는 텐서플로우가 효율적인 연구를 위해 제공하는 기능을 알아보도록 하겠습니다.
파라미터의 상태를 제어한다는 것은 연구에서 매우 중요한 작업입니다.
예를 들어, 케라스 Dense layer의 파라미터나 bias는 층에 저장되어 있긴 하지만, 여전히 state를 다루기엔 매우 불편합니다.
더욱 편리한 제어를 위해 tf.variable_creator_scope를 사용합니다.
class FactorizedVariable(tf.Module):
    def __init__(self, a, b):
        self.a = a
        self.b = b

tf.register_tensor_conversion_function(
  FactorizedVariable, lambda x, *a, **k: tf.matmul(x.a, x.b))

def scope(next_creator, **kwargs):
    shape = kwargs['initial_value']().shape
    if len(shape) != 2: return next_creator(**kwargs)
    return FactorizedVariable(tf.Variable(tf.random.normal([shape[0], 2])),
                                         tf.Variable(tf.random.normal([2, shape[1]])))

with tf.variable_creator_scope(scope):
    d = tf.keras.layer.Dense(10)
    d(tf.zeros[20, 10])
assert isinstance(d.kernel, FactorizedVariable)- 먼저, 저장하고 싶은 값을 선택하고, tf.Module을 상속받은 클래스를 정의합니다.
tf.Module은 저장하고 싶은 변수를 자동으로 추적할 수 있도록 도와줍니다.
위의 코드는 매우 간단하지만, 실제로 사용하는 모델에서는 파라미터가 매우 많기 때문에 관리가 힘듭니다. 따라서 tf.variable_creator_scope를 사용하면 자동 추적 및 파라미터의 변화를 확인할 수 있기 때문에 매우 편리합니다.
딥러닝을 연구하는 데에 있어서 계산 속도는 매우 중요합니다. 텐서플로우는 TensorFlow compiler, XLA 등을 통해 빠른 연산 속도를 지원하고 있습니다. 더욱 효과적으로 사용하려면 @tf.function(experimental_compile=True)를 사용하세요.
활성화 함수의 예를 보겠습니다. 활성화 함수에서는 element-wise 연산 때문에 속도 측면에서 부정적인 영향을 줄지도 모릅니다.
다음 예제 코드에서 속도 차이를 볼 수 있습니다.
def f(x):
    return tf.math.log(2*tf.exp(tf.nn.relu(x+1)))

c_f = tf.function(f, experimental_compile=True)
c_f(tf.zeros([100, 100]))

f = tf.function(f)
f(tf.zeros([100, 100]))

print(timeit.timeit(lambda: f(tf.zeros([100, 100])), number = 10))
# 0.007

print(timeit.timeit(lambda: c_f(tf.zeros([100, 100])), number = 10))
# 0.005 -- ~25% faster!- tf.function 사용은 동일합니다. 단지, experimental_compile=True를 추가합니다.
- linear operations가 포함된 함수나 Bert를 포함한 large-scale 모델에서 효과를 볼 수 있습니다.
element-wise 연산은 옵티마이저에서도 매우 빈번하게 일어납니다. @tf.function을 옵티마이저 코드에 추가한다면 효과를 볼 수 있습니다.
다음은 직접 옵티마이저를 정의해서 @tf.function을 사용하는 예제입니다.
class MyOptimizer(tf.keras.optimizers.Optimizer):
    def __init__(self, lr, power, avg):
        super().__init__(name="MyOptimizer")
        self.lrate, self.pow, self.avg = lr, power, avg

    def get_config(self): pass
    def _create_slots(self, var_list):
        for v in var_list: self.add_slot(v, "accum", tf.zeros_like(v))

    @tf.function(experimental_compile=True)
    def _resource_apply_dense(self, grad, var, apply_state = None):
        acc = self.get_slot(var, "accum")
        acc.assign(self.avg * tf.pow(grad, self.pow) + (1-self.avg) * acc)

        return var.assign_sub(self.lrate * grad/tf.pow(acc, self.pow))
다음은 Vectorization을 이야기해보겠습니다. 이는 성능 향상을 위해 매우~! 중요한 지표입니다.
머신 러닝 모델을 다루기 위해 Vectorization이 중요하다는 것은 이미 다 알고 있는 사실이지만, 다루기가 어렵습니다.
그래서 텐서플로우는 이를 위해 auto-Vectorization을 제공합니다. 이 기능은 element-wise 연산이나 batch computation에서 성능 향상을 위해 사용될 것입니다.
Jacobian 연산을 수행하는 예제 코드입니다. jacobian은 미분값을 저장해놓은 행렬입니다.
이를 위해선 tf.GradientTape에서 tape.gradient를 무수히 호출해야하고, 다수의 for-loop를 사용하고, Tensor를 쌓아야 합니다.
이러한 과정을 거치는 코드는 언제나 작동하지만, 좀 더 효율적으로 다룰 수 있는 방법을 텐서플로우가 제공합니다.
tf.vectorized_map을 사용하는 것입니다.
x = tf.random.normal([10, 10])

with tf.GradientTape(persistent=True) as t:
    t.watch(x)
    y = tf.exp(tf.matmul(x, x))
    jac = tf.vectorized_map(
                            lambda yi: tf.vectorized_map(
lambda yij: t.gradient(yij, x), yi), y)- tf.vectorized_map을 사용하면 빠른 속도로 연산을 수행할 수 있습니다. 하지만 코드가 복잡합니다.
- 텐서플로우는 이를 위해 jacobian을 아예 함수로 제공합니다.
x = tf.random.normal([10, 10])

with tf.GradientTape() as t:
    t.watch(x)
    y = tf.exp(tf.matmul(x, x))
jac = t.jacobian(y, x)- 제공하는 jacobian을 사용하면, 기존 코드보다 10배는 빠르다고 합니다.
마지막으로 데이터에 관한 이야기입니다.
텐서플로우를 사용하는 우리는 항상 매우 커다란 크기의 array를 다루게 됩니다.
또, 머신 러닝 모델을 다루다보면 서로 다른 타입의 데이터를 다루기도 합니다. type도 다르고, shape 다르고...
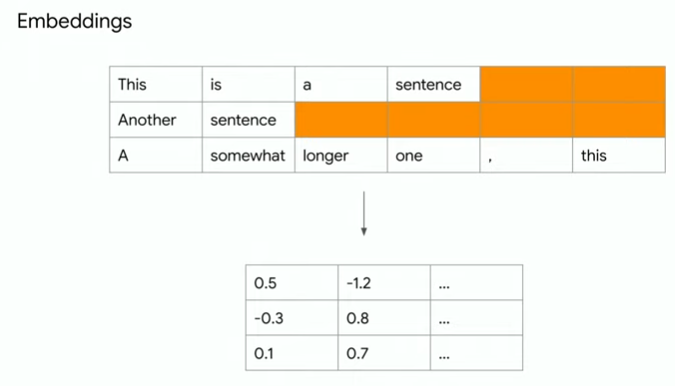
예를 들어, 텐서플로우는 다음과 같은 예를 임베딩 형태로 만들어 줍니다.

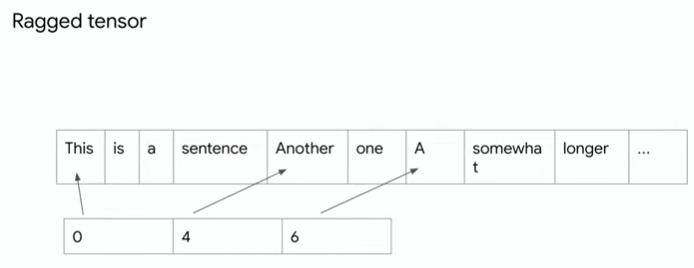
텐서플로우는 서로 다른 길이의 데이터를 다루기 위해 ragged tensor 형태를 사용합니다.

data = [['this', 'is', 'a', 'sentence'],
       ['another', 'one'],
       ['a', 'somewhat', 'longer', 'one', ',', 'this']]

rt = tf.ragged.constant(data)
vocab = tf.lookup.StaticVocabularyTable(
    tf.lookup.KeyValueTensorInitializer(
    ['This', 'is', 'a', 'sentence', 'another', 'one', 'somewhat', 'longer'],
    tf.range(8, dtype = tf.int64)), 1)

rt = tf.ragged.map_flat_values(lambda x:vocab.lookup(x), rt)
embedding_table = tf.Variable(tf.random.normal([9, 10]))
rt = tf.gather(embedding_table, rt)
tf.math.reduce_mean(rt, axis = 1)
# Result has shape (3, 10)
길이가 다르고, type이 다르면 tf.ragged를 사용하세요!
'# Machine Learning > TensorFlow video 정리' 카테고리의 다른 글
| TF Dev Summit 2020 훑어보기(Scaling Tensorflow data processing with tf.data) (0) | 2020.03.28 |
|---|---|
| TF Dev Summit 2020 훑어보기(TensorBoard dev.) (0) | 2020.03.17 |
| TF Dev Summit 2020 훑어보기(TensorFlow Hub) (0) | 2020.03.16 |
| TF Dev Summit 2020 훑어보기(Learning to read with TensorFlow and Keras) (0) | 2020.03.15 |
| TF Dev Summit 2020 훑어보기(Keynote) (0) | 2020.03.15 |