다음 글을 참조하여 번역합니다(+ 개인 공부), 예제는 tf 2.0을 기준으로 합니다.

https://www.tensorflow.org/guide/data?hl=en


tf.data: Build TensorFlow input pipelines  |  TensorFlow Core

The tf.data API enables you to build complex input pipelines from simple, reusable pieces. For example, the pipeline for an image model might aggregate data from files in a distributed file system, apply random perturbations to each image, and merge random

www.tensorflow.org


tf.data API는 복잡한 input pipeline을 재사용성, 단순하게 만들어 사용할 수 있게 합니다. 예를 들어, 이미지 모델을 위한 파이프라인은 분산 파일 시스템에서 데이터를 통합하고, 각 이미지에 랜덤 변화를 주고, 학습에서 랜덤하게 선택한 이미지를 병합하여 사용할 수 있습니다. 텍스트 모델을 위한 파이프라인은 원본 텍스트 데이터에서 심볼을 추출하고, 룩업 테이블의 임베딩 식별자로 변환하여, 길이가 다른 시퀀스를 일괄 처리할 수 있습니다. tf.data API는 대용량의 데이터를 다룰 수 있게 도와주고, 서로 다른 데이터 포맷을 읽을 수 있으며, 복잡한 변환 작업을 수행합니다.

tf.data API는 일련의 요소를 나타낼 수 있는 tf.data.Dataset abstraction을 소개합니다. 예를 들어, 이미지 파이프라인에서 요소는 이미지와 레이블을 나타내는 텐서의 요소 쌍인 단일 학습 예시를 나타낼 수 있습니다.

dataset을 생성하는 두 가지 방법이 있습니다.

  • data source는 메모리 또는 하나 이상의 파일에 저장된 데이터로 구성합니다.
  • 데이터 변환은 하나 이상의 tf.data.Dataset 객체에서 데이터 세트를 구성합니다.

Basic mechanics

input pipeline을 만들기 위해서는 data source를 필수적으로 사용해야 합니다. 예를 들어, 메모리에 존재하는 데이터로 Dataset을 구성하는 경우, tf.data.Dataset.from_tensors()tf.data.Dataset.from_tensor_slices()를 사용합니다. 만약 TFRecord 포맷을 사용하고 있다면, tf.data.TFRecordDataset()을 사용합니다.

Dataset 객체를 가지고 있으면, tf.data.Dataset 객체의 메서드를 호출하여 새로운 Dataset을 만들 수 있습니다. 예를 들어, 원소당 변환을 수행하는 Dataset.map()이나 다중 원소 변환을 수행하는 Dataset.batch() 적용할 수 있습니다. 전체 변환 목록은 tf.data.Dataset 문서를 참조하세요.

Dataset 객체는 Python iterable합니다. for-loop를 통해 해당 요소를 사용할 수 있습니다.

dataset = tf.data.Dataset.from_tensor_slices([8, 3, 0, 8, 2, 1])
dataset
  • <TensorSliceDataset shapes: (), types: tf.int32>
for elem in dataset:
  print(elem.numpy())
  • 8 3 0 8 2 1

iter을 통해 명시적으로 python iterator를 생성하고, next를 통해 사용할 수 있습니다.

it = iter(dataset)

print(next(it).numpy())
  • 8

같은 방법으로 데이터셋의 원소를 모든 요소에 대해 단일 결과를 생성하는 reduce 변환을 통해 사용할 수 있습니다. 다음 예제는 데이터셋에 존재하는 숫자의 합을 계산할 때 reduce 변환을 어떻게 활용하는지 보여줍니다.

print(dataset.reduce(0, lambda state, value: state + value).numpy())
  • 22

Dataset structure

dataset는 동일한 구조의 요소를 포함하며 구조의 개별 요소는 tf.TypeSpec으로 나타낼 수 있는 Tensor, SparseTensor, RaggedTensor, TensorArray, Dataset의 구조를 가질 수 있습니다.

Dataset.element_spec 속성을 사용하면 개별 요소의 유형을 확인할 수 있습니다. 단일 요소, 튜플 요소, 중첩 튜플 요소를 가지는  tf.TypeSpec 객체를 반환합니다. 다음과 같습니다.

dataset1 = tf.data.Dataset.from_tensor_slices(tf.random.uniform([4, 10]))

dataset1.element_spec
  • TensorSpec(shape=(10,), dtype=tf.float32, name=None)
dataset2 = tf.data.Dataset.from_tensor_slices(
   (tf.random.uniform([4]),
    tf.random.uniform([4, 100], maxval=100, dtype=tf.int32)))

dataset2.element_spec
  • (TensorSpec(shape=(), dtype=tf.float32, name=None), TensorSpec(shape=(100,), dtype=tf.int32, name=None))
dataset3 = tf.data.Dataset.zip((dataset1, dataset2))

dataset3.element_spec
  • (TensorSpec(shape=(10,), dtype=tf.float32, name=None), (TensorSpec(shape=(), dtype=tf.float32, name=None), TensorSpec(shape=(100,), dtype=tf.int32, name=None)))
# Dataset containing a sparse tensor.
dataset4 = tf.data.Dataset.from_tensors(tf.SparseTensor(indices=[[0, 0], [1, 2]], values=[1, 2], dense_shape=[3, 4]))

dataset4.element_spec
  • SparseTensorSpec(TensorShape([3, 4]), tf.int32)

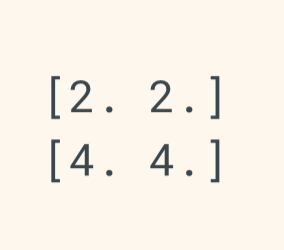
여기서 tf.SparseTensor(indices=[[0, 0], [1, 2]], values =[1, 2], dense_shape=[3, 4])는 다음과 같은 결과를 보여줍니다.

  • [[1, 0, 0, 0]
     
    [0, 0, 2, 0]
     
    [0, 0, 0, 0]]

indices는 [0, 0], [1, 2]에 각각 non-zero value가 있음을 명시합니다. 실제로 위의 결과에서 [0, 0]에는 value의 첫 번째 값인 1, [1, 2]에는 두 번째 값인 2가 출력되고 있습니다. dense_shape = [3, 4]는 (3, 4)의 2차원 텐서를 나타냅니다.


# Use value_type to see the type of value represented by the element spec
dataset4.element_spec.value_type
  • tensorflow.python.framework.sparse_tensor.SparseTensor

Dataset 변환은 어떠한 구조의 dataset도 지원할 수 있습니다.각 원소에 함수를 적용하는  Dataset.map()과 Dataset.filter() 변환을 사용할 때, 요소 구조는 함수의 인수를 결정합니다.

dataset1 = tf.data.Dataset.from_tensor_slices(
    tf.random.uniform([4, 10], minval=1, maxval=10, dtype=tf.int32))

dataset1
  • <TensorSliceDataset shapes: (10,), types: tf.int32>
for z in dataset1:
  print(z.numpy())
  • [8 9 2 7 2 4 8 8 1 7]
    [6 8 6 5 6 5 1 7 3 7]
    [8 6 9 8 7 9 4 7 4 7]
    [4 1 2 5 9 9 1 9 6 8]
dataset2 = tf.data.Dataset.from_tensor_slices(
   (tf.random.uniform([4]),
    tf.random.uniform([4, 100], maxval=100, dtype=tf.int32)))

dataset2
  • <TensorSliceDataset shapes: ((), (100,)), types: (tf.float32, tf.int32)>
dataset3 = tf.data.Dataset.zip((dataset1, dataset2))

dataset3
  • <ZipDataset shapes: ((10,), ((), (100,))), types: (tf.int32, (tf.float32, tf.int32))>
for a, (b,c) in dataset3:
  print('shapes: {a.shape}, {b.shape}, {c.shape}'.format(a=a, b=b, c=c))
  • shapes: (10,), (), (100,)
    shapes: (10,), (), (100,)
    shapes: (10,), (), (100,)
    shapes: (10,), (), (100,)

이글은 다음 문서를 참조합니다.

www.tensorflow.org/guide/keras/custom_callback

(번역은 자력 + 파파고 + 구글 번역기를 사용하였으니, 부자연스럽더라도 양해바랍니다.)


Keras model을 변경하고 읽거나 학습, 평가, 추론하는 동안에 custom callbacks는 Keras model을 customize하는데에 있어서 강력한 도구입니다. 그 예로 tf.keras.callbacks가 있습니다. 또한, Tensorboard는 학습 진전과 결과를 도출하고 시각화할 수 있으며, tf.keras.callbacks.ModelCheckpoint는 자동적으로 학습 또는 그 외의 행동에 대한 결과를 자동으로 저장해줍니다. 이

이번 가이드에서는 이러한 것들이 무엇을 하며 언제 불리는지에 대해 다루고 어떻게 build하는지 설명합니다. 


Introduction to Keras callbacks


케라스에서 Callback은 학습(batch/epoch start and ends), 평가, 추론의 다양한 단계에서 호출할 수 있는 메소드의 집합으로서 기능적으로 구체적인 정보들에 대해 접근할 수 있습니다. 학습하는 동안 모델의 statistics(accuracy, recall etc.)와 내부 상태를 관찰하는데 매우 유용합니다. 

tf.keras.Model.fit(), tf.keras.Model.evaluate(), tf.keras.Model.predict()callbacks list인자를 주어 사용할 수 있습니다. 

먼저 tensorflow를 import하고 간단한 모델을 만들어 봅니다.

# Define the Keras model to add callbacks to
def get_model():
  model = tf.keras.Sequential()
  model.add(tf.keras.layers.Dense(1, activation = 'linear', input_dim = 784))
  model.compile(optimizer=tf.keras.optimizers.RMSprop(lr=0.1), loss='mean_squared_error', metrics=['mae'])
  return model
  
  # Load example MNIST data and pre-process it
(x_train, y_train), (x_test, y_test) = tf.keras.datasets.mnist.load_data()
x_train = x_train.reshape(60000, 784).astype('float32') / 255
x_test = x_test.reshape(10000, 784).astype('float32') / 255

이제 batch start, end를 추적할 수 있는 간단한 custom callback을 작성합니다. 이 코드는 각 batch에 대한 정보를 나타냅니다.

import datetime

class MyCustomCallback(tf.keras.callbacks.Callback):

  def on_train_batch_begin(self, batch, logs=None):
    print('Training: batch {} begins at {}'.format(batch, datetime.datetime.now().time()))

  def on_train_batch_end(self, batch, logs=None):
    print('Training: batch {} ends at {}'.format(batch, datetime.datetime.now().time()))

  def on_test_batch_begin(self, batch, logs=None):
    print('Evaluating: batch {} begins at {}'.format(batch, datetime.datetime.now().time()))

  def on_test_batch_end(self, batch, logs=None):
    print('Evaluating: batch {} ends at {}'.format(batch, datetime.datetime.now().time()))

tf.keras.Model.fit()의 인자로 전달해주면 각 단계에 대한 정보를 제공합니다.

model = get_model()
_ = model.fit(x_train, y_train,
          batch_size=64,
          epochs=1,
          steps_per_epoch=5,
          verbose=0,
          callbacks=[MyCustomCallback()])


Model methods that take callbacks


위와 같은 기능들은 다음 tf.keras.Model methods에서도 사용할 수 있습니다.

  • fit(), fit_generator() : 고정된 epochs만큼 학습합니다.
  • evaluate(), evaluate_generator() : loss, metrics values를 도출합니다.
  • predict(), predict_generator() : input data or data generator에 대한 추론 결과를 도출합니다.
_ = model.evaluate(x_test, y_test, batch_size=128, verbose=0, steps=5,
          callbacks=[MyCustomCallback()])


An overview of callback methods

Common methods for training/testing/predicting


학습, 평가, 추론시에 callback 함수는 다음과 같은 methods를 override합니다.

  • on_(train|test|predict)_begin(self, logs = None)
  • on_(train|test|predict)_end(self, logs = None)
  • on_(train|test|predict)_batch_begin(self, batch, logs = None)

: 이 method에서 log는 현재 batch number와 size를 dict형태로 가지고 있습니다.

: ex) logs["size"], logs["batch"] ( 아래 예시 참고 )

  • on_(train|test|predict)_batch_end(self, batch, logs = None)

: logs는 merics result를 담고 있습니다. ( 아래 예시 참고 )


Training specific methods


학습시에 추가로 제공됩니다.

  • on_epoch_begin(self, epoch, logs = None)
  • on_epoch_end(self, epoch, logs = None)


Usage of logs dict


logs dict는 loss value, epoch or batch의 metrics를 포함합니다.

class LossAndErrorPrintingCallback(tf.keras.callbacks.Callback):

  def on_train_batch_end(self, batch, logs=None):
    print('For batch {}, loss is {:7.2f}.'.format(batch, logs['loss']))

  def on_test_batch_end(self, batch, logs=None):
    print('For batch {}, loss is {:7.2f}.'.format(batch, logs['loss']))

  def on_epoch_end(self, epoch, logs=None):
    print('The average loss for epoch {} is {:7.2f} and mean absolute error is {:7.2f}.'.format(epoch, logs['loss'], logs['mae']))

model = get_model()
_ = model.fit(x_train, y_train,
          batch_size=64,
          steps_per_epoch=5,
          epochs=3,
          verbose=0,
          callbacks=[LossAndErrorPrintingCallback()])

이와 같이, evaluate()에서도 동일하게 사용가능합니다.


Examples of Keras callback applications

Early stopping at minimum loss


다음 예제는 model.stop_training(boolean)을 이용하여 최소 loss에 도달했을때 학습을 중단시킵니다. 

학습을 중단하기 전에 사용자가 얼마나 기다려야 하는지에 대한 정보를 patience로 제공받게 됩니다.

(patience가 10이라면 최소 손실로부터 10epoch동안 변화가 없을 시 earlystop)

import numpy as np

class EarlyStoppingAtMinLoss(tf.keras.callbacks.Callback):
  """Stop training when the loss is at its min, i.e. the loss stops decreasing.

  Arguments:
      patience: Number of epochs to wait after min has been hit. After this
      number of no improvement, training stops.
  """

  def __init__(self, patience=0):
    super(EarlyStoppingAtMinLoss, self).__init__()

    self.patience = patience

    # best_weights to store the weights at which the minimum loss occurs.
    self.best_weights = None

  def on_train_begin(self, logs=None):
    # The number of epoch it has waited when loss is no longer minimum.
    self.wait = 0
    # The epoch the training stops at.
    self.stopped_epoch = 0
    # Initialize the best as infinity.
    self.best = np.Inf

  def on_epoch_end(self, epoch, logs=None):
    current = logs.get('loss')
    if np.less(current, self.best):
      self.best = current
      self.wait = 0
      # Record the best weights if current results is better (less).
      self.best_weights = self.model.get_weights()
    else:
      self.wait += 1
      if self.wait >= self.patience:
        self.stopped_epoch = epoch
        self.model.stop_training = True
        print('Restoring model weights from the end of the best epoch.')
        self.model.set_weights(self.best_weights)

  def on_train_end(self, logs=None):
    if self.stopped_epoch > 0:
      print('Epoch %05d: early stopping' % (self.stopped_epoch + 1))
model = get_model()
_ = model.fit(x_train, y_train,
          batch_size=64,
          steps_per_epoch=5,
          epochs=30,
          verbose=0,
          callbacks=[LossAndErrorPrintingCallback(), EarlyStoppingAtMinLoss()])


Learning Late scheduling


모델 학습동안에 일반적으로 행하는 것은 epochs에 따라 learning rate를 decay시켜주는 것입니다. Keras backend는 get_value api를 통해 이를 접근합니다. 이 예제에서 learning rate가 custom Callback에 의해 어떻게 동적으로 변화하는지 보겠습니다.

tf.keras.callbacks.LearningRateScheduler는 보다 일반적인 구현을 제공합니다.

class LearningRateScheduler(tf.keras.callbacks.Callback):
  """Learning rate scheduler which sets the learning rate according to schedule.

  Arguments:
      schedule: a function that takes an epoch index
          (integer, indexed from 0) and current learning rate
          as inputs and returns a new learning rate as output (float).
  """

  def __init__(self, schedule):
    super(LearningRateScheduler, self).__init__()
    self.schedule = schedule

  def on_epoch_begin(self, epoch, logs=None):
    if not hasattr(self.model.optimizer, 'lr'):
      raise ValueError('Optimizer must have a "lr" attribute.')
    # Get the current learning rate from model's optimizer.
    lr = float(tf.keras.backend.get_value(self.model.optimizer.lr))
    # Call schedule function to get the scheduled learning rate.
    scheduled_lr = self.schedule(epoch, lr)
    # Set the value back to the optimizer before this epoch starts
    tf.keras.backend.set_value(self.model.optimizer.lr, scheduled_lr)
    print('\nEpoch %05d: Learning rate is %6.4f.' % (epoch, scheduled_lr))

keras.backend.get_value와 set_value에 주목 + self.model.optimizer.lr이 현재 모델의 learning rate에 대한 정보를 제공합니다.

tf.keras.callbacks.Callback은 기본적으로 model에 대한 정보를 가지고 있습니다. self.으로 접근.

LR_SCHEDULE = [
    # (epoch to start, learning rate) tuples
    (3, 0.05), (6, 0.01), (9, 0.005), (12, 0.001)
]

def lr_schedule(epoch, lr):
  """Helper function to retrieve the scheduled learning rate based on epoch."""
  if epoch < LR_SCHEDULE[0][0] or epoch > LR_SCHEDULE[-1][0]:
    return lr
  for i in range(len(LR_SCHEDULE)):
    if epoch == LR_SCHEDULE[i][0]:
      return LR_SCHEDULE[i][1]
  return lr

model = get_model()
_ = model.fit(x_train, y_train,
          batch_size=64,
          steps_per_epoch=5,
          epochs=15,
          verbose=0,
          callbacks=[LossAndErrorPrintingCallback(), LearningRateScheduler(lr_schedule)])


이글은 다음 문서를 참조합니다.

www.tensorflow.org/guide/keras/save_and_serialize

(번역은 자력 + 파파고 + 구글 번역기를 사용하였으니, 부자연스럽더라도 양해바랍니다.)


이번 가이드는 모델을 저장하는 방법과 serialization하는 방법을 다룹니다.


Part 1 : Saving Sequential models or Functional models

예제를 보곘습니다.

from tensorflow import keras
from tensorflow.keras import layers

inputs = keras.Input(shape=(784,), name='digits')
x = layers.Dense(64, activation='relu', name='dense_1')(inputs)
x = layers.Dense(64, activation='relu', name='dense_2')(x)
outputs = layers.Dense(10, activation='softmax', name='predictions')(x)

model = keras.Model(inputs=inputs, outputs=outputs, name='3_layer_mlp')
model.summary()

훈련시킨 후 모델의 가중치와 optimizer state를 저장할 수 있습니다. 재미는 없지만 학습하지 않은 모델도 저장 가능합니다.

(x_train, y_train), (x_test, y_test) = keras.datasets.mnist.load_data()
x_train = x_train.reshape(60000, 784).astype('float32') / 255
x_test = x_test.reshape(10000, 784).astype('float32') / 255

model.compile(loss='sparse_categorical_crossentropy',
              optimizer=keras.optimizers.RMSprop())
history = model.fit(x_train, y_train,
                    batch_size=64,
                    epochs=1)
# Save predictions for future checks
predictions = model.predict(x_test)


Whole-model saving

빌드된 모델을 하나로 저장할 수 있습니다. 모델을 만든 코드가 더 이상 남아있지 않더라도 이 파일을 통해 다시 사용할 수 있습니다.

파일에는 다음 내용이 포함됩니다.

  • 모델 구조
  • weight values
  • training config(compile)
  • optimizer and state
# Save the model
model.save('path_to_my_model.h5')

# Recreate the exact same model purely from the file
new_model = keras.models.load_model('path_to_my_model.h5')

import numpy as np

# Check that the state is preserved
new_predictions = new_model.predict(x_test)
np.testing.assert_allclose(predictions, new_predictions, atol=1e-6)

# Note that the optimizer state is preserved as well:
# you can resume training where you left off.


Export to SavedModel

전체모델을 Tensorflow savedmodel format으로 추출할 수 있습니다. Tensorflow 객체용 독립형 serialization format이며 Python 이외의 Tensorflow 구현 뿐만아니라 Tensorflow Serving기능도 제공합니다.

# Export the model to a SavedModel
keras.experimental.export_saved_model(model, 'path_to_saved_model')

# Recreate the exact same model
new_model = keras.experimental.load_from_saved_model('path_to_saved_model')

# Check that the state is preserved
new_predictions = new_model.predict(x_test)
np.testing.assert_allclose(predictions, new_predictions, atol=1e-6)

# Note that the optimizer state is preserved as well:
# you can resume training where you left off.

SavedModel은 다음을 포함합니다.

  • model weights를 포함한 Tensorflow checkpoint
  • Tensorflow graph가 포함된 SavedModel 프로토타입. 예측(Serving), 학습, 평가를 위한 별도의 그래프. 이전에 compile하지 않았다면, inference 그래프만 추출됨.
  • 모델 구조


Architecture-only saving

weight나 optimizer는 관심이 없고, 오로지 모델 구조에만 관심이 가는 경우가 있습니다. 이러한 경우에 get_config()를 통해 모델의 config를 검색하면 됩니다. 같은 모델을 재생성할 수 있도록 파이썬 dict구조로 되어 있습니다. 이렇게 불러진 모델은 이전에 학습한 정보는 가지고 있지 않습니다.

config = model.get_config()
reinitialized_model = keras.Model.from_config(config)

# Note that the model state is not preserved! We only saved the architecture.
new_predictions = reinitialized_model.predict(x_test)
assert abs(np.sum(predictions - new_predictions)) > 0.

python dict대신에 to_json(), from_json()을 사용하여 JSON으로도 저장할 수 있습니다. disk에 저장할 때 유용하게 사용됩니다.

json_config = model.to_json()
reinitialized_model = keras.models.model_from_json(json_config)


Weights-only saving

weights에만 관심이 있는 경우에 get_weights()를 사용하여 Numpy array로 이루어진 weights를 찾을 수 있습니다. 또한, 모델의 상태를 set_weights로 변경할 수 있습니다.

weights = model.get_weights()  # Retrieves the state of the model.
model.set_weights(weights)  # Sets the state of the model.

get_config() / from_config() 와 get_weights() / set_weights()를 적절히 섞어 사용할 수 있습니다. 하지만, model.save()와는 다르게 이들은 학습 config와 optimizer를 포함하지 않습니다. 따라서 compile을 다시 설정해주어야 합니다.

config = model.get_config()
weights = model.get_weights()

new_model = keras.Model.from_config(config)
new_model.set_weights(weights)

# Check that the state is preserved
new_predictions = new_model.predict(x_test)
np.testing.assert_allclose(predictions, new_predictions, atol=1e-6)

# Note that the optimizer was not preserved,
# so the model should be compiled anew before training
# (and the optimizer will start from a blank state).

get_weights() / set_weights()와 같은 의미이면서 디스크에 저장하려면 save_weighs(fpath) / load_weights(fpath)를 사용하면 됩니다.

# Save JSON config to disk
json_config = model.to_json()
with open('model_config.json', 'w') as json_file:
    json_file.write(json_config)
# Save weights to disk
model.save_weights('path_to_my_weights.h5')

# Reload the model from the 2 files we saved
with open('model_config.json') as json_file:
    json_config = json_file.read()
new_model = keras.models.model_from_json(json_config)
new_model.load_weights('path_to_my_weights.h5')

# Check that the state is preserved
new_predictions = new_model.predict(x_test)
np.testing.assert_allclose(predictions, new_predictions, atol=1e-6)

# Note that the optimizer was not preserved.

이는 너무 복잡하니 다음과 같은 방법을 추천드립니다.

model.save('path_to_my_model.h5')
del model
model = keras.models.load_model('path_to_my_model.h5')


Weights-only saving in SavedModel format

save_weights는 keras에서 HDF5 format, Tensorflow에서 SavedModel format 형태를 만들어 냅니다. 이러한 형식은 사용자가 제공하는 되로 선택되어집니다. ".h5", "keras"인 경우는 Keras HDF5 형식을 사용합니다. 다른 모든 항목은 SavedModel로 기본 설정 됩니다.

model.save_weights('path_to_my_tf_savedmodel')

명시적으로 save_format인자("tf" or "h5")를 전달하여 설정할 수 있습니다. 

model.save_weights('path_to_my_tf_savedmodel', save_format='tf')


Saving Subclassed Models

Sequential, Functional Model은 DAG of layers를 나타내는 데이터구조입니다. 이들은 안전하게 serialized, deserialized될 수 있습니다.

subclassed되어진 모델은 데이터 구조가 아닌 그저 코드의 일부분일 뿐입니다. 이러한 모델의 구조는 call method에서 정의됩니다. 이는 모델이 안전하게 serialized될 수 없다는 것을 의미합니다.

모델을 불러오기 위해, 모델을 생성한 코드(the code of the model subclass)에 접근할 수 있어야합니다. 대신, 이러한 코드를 바이트코드(pickling)로 serializing할 수 있지만 안전하지 않습니다.

class ThreeLayerMLP(keras.Model):

  def __init__(self, name=None):
    super(ThreeLayerMLP, self).__init__(name=name)
    self.dense_1 = layers.Dense(64, activation='relu', name='dense_1')
    self.dense_2 = layers.Dense(64, activation='relu', name='dense_2')
    self.pred_layer = layers.Dense(10, activation='softmax', name='predictions')

  def call(self, inputs):
    x = self.dense_1(inputs)
    x = self.dense_2(x)
    return self.pred_layer(x)

def get_model():
  return ThreeLayerMLP(name='3_layer_mlp')

model = get_model()

우선, 한번도 사용되지 않은 모델은 저장할 수 없습니다. 

subclassed model은 weights를 생성하기 위해 한번쯤은 데이터가 필요하기 때문입니다. 

모델이 호출될 때 까지, input dtype, shape를 알 수 없고 weight variable또한 마찬가지입니다. Functional Model은 가장 처음에 keras.Input을 통해 input dtype, shape를 정의하기 때문에 이러한 문제가 없습니다. 

(x_train, y_train), (x_test, y_test) = keras.datasets.mnist.load_data()
x_train = x_train.reshape(60000, 784).astype('float32') / 255
x_test = x_test.reshape(10000, 784).astype('float32') / 255

model.compile(loss='sparse_categorical_crossentropy',
              optimizer=keras.optimizers.RMSprop())
history = model.fit(x_train, y_train,
                    batch_size=64,
                    epochs=1)

subclassed model을 저장하는데에 추천하는 방법은 model과 연관된 모든 variable을 담고있는 Tensorflow SavedModel checkpoint를 만드는 save_weights()를 사용하는 것입니다.(weights, optimizer state, etc.)

model.save_weights('path_to_my_weights', save_format='tf')

# Save predictions for future checks
predictions = model.predict(x_test)
# Also save the loss on the first batch
# to later assert that the optimizer state was preserved
first_batch_loss = model.train_on_batch(x_train[:64], y_train[:64])

모델을 복원하기 위해선 만들어진 모델 객체에 접근할 수 있어야합니다.

metric, optimizer의 상태를 복원하려면 model을 compile하고 load_weights를 호출하기 전에 일부 데이터를 호출해야합니다.

# Recreate the model
new_model = get_model()
new_model.compile(loss='sparse_categorical_crossentropy',
                  optimizer=keras.optimizers.RMSprop())

# This initializes the variables used by the optimizers,
# as well as any stateful metric variables
new_model.train_on_batch(x_train[:1], y_train[:1])

# Load the state of the old model
new_model.load_weights('path_to_my_weights')

# Check that the model state has been preserved
new_predictions = new_model.predict(x_test)
np.testing.assert_allclose(predictions, new_predictions, atol=1e-6)

# The optimizer state is preserved as well,
# so you can resume training where you left off
new_first_batch_loss = new_model.train_on_batch(x_train[:64], y_train[:64])
assert first_batch_loss == new_first_batch_loss

이글은 다음 문서를 참조합니다.

www.tensorflow.org/guide/keras/custom_layers_and_models

(번역은 자력 + 파파고 + 구글 번역기를 사용하였으니, 부자연스럽더라도 양해바랍니다.)


You can optionally enable serialization on your layers

Functional model의 기능 중 하나로서 get_config를 사용하여 layer의 정보를 serialization할 수 있습니다. (serialization은 unit과 같은 정보를 송수신 할 수 있게 하는 것입니다.)

class Linear(layers.Layer):

  def __init__(self, units=32):
    super(Linear, self).__init__()
    self.units = units

  def build(self, input_shape):
    self.w = self.add_weight(shape=(input_shape[-1], self.units),
                             initializer='random_normal',
                             trainable=True)
    self.b = self.add_weight(shape=(self.units,),
                             initializer='random_normal',
                             trainable=True)

  def call(self, inputs):
    return tf.matmul(inputs, self.w) + self.b

  def get_config(self):
    return {'units': self.units}


# Now you can recreate the layer from its config:
layer = Linear(64)
config = layer.get_config()
print(config)
new_layer = Linear.from_config(config)

base layer class의 __init__ method가 name, dtype과 같은 keyword arguments를 가지고 있습니다. 이러한 것을 __init__의 상위 클래스에 전달하고 layer 구성에 포함시키는 것이 좋습니다.

class Linear(layers.Layer):

  def __init__(self, units=32, **kwargs):
    super(Linear, self).__init__(**kwargs)
    self.units = units

  def build(self, input_shape):
    self.w = self.add_weight(shape=(input_shape[-1], self.units),
                             initializer='random_normal',
                             trainable=True)
    self.b = self.add_weight(shape=(self.units,),
                             initializer='random_normal',
                             trainable=True)

  def call(self, inputs):
    return tf.matmul(inputs, self.w) + self.b

  def get_config(self):
    config = super(Linear, self).get_config()
    config.update({'units': self.units})
    return config


layer = Linear(64)
config = layer.get_config()
print(config)
new_layer = Linear.from_config(config)

이러한 config에서 deserializing을 하고 싶다면 from_config를 이용하면 좋습니다.

def from_config(cls, config):
  return cls(**config)

이 내용은 다음 글에서 더 자세히 다룹니다.


Privileged training argument in the call method

몇몇 BatchNormalization, Dropout과 같은 layer는 학습, 추론을 하는 동안 다른 기능을 가집니다. 이러한 layer의 경우 학습에 대한 여부를 boolean의 형태로 노출시키는 것이 표준 관례입니다.

이러한 인자는 fit()에서 사용하기 더 쉽습니다.

class CustomDropout(layers.Layer):

  def __init__(self, rate, **kwargs):
    super(CustomDropout, self).__init__(**kwargs)
    self.rate = rate

  def call(self, inputs, training=None):
    if training:
        return tf.nn.dropout(inputs, rate=self.rate)
    return inputs


Building Models

The Model class

일반적으로 block을 쌓기 위해 Layer 클래스를 사용하고, 학습을 위해 Model 객체를 정의합니다.

예를 들어 ResNet50에서는 여러 Layer로 subclassing된 ResNet block이 존재하고 Model에 통과시킵니다.

Model 클래스는 Layer와 같은 API를 가지고 있으며 다음과 같은 차이점을 가집니다.

  • model.fit(), model.evaluate(), model.predict()를 가집니다. 
  • model.layers 속성을 통해 내부 계층을 리스트로 접근할 수 있습니다. 
  • saving and serialization API를 가집니다.

사실 Layer 클래스는 "layer"(conv layer or recurrent layer)과 "block"(ResNet block or Inception block)과 의미를 공유합니다.

한편, Model 클래스는 문맥적으로 "model"(deep learning model) 과 "network"(deep neural network)와 의미를 공유합니다.

Model을 정의하여 fit()을 통해 학습하고, save_weights를 통해 weight를 저장할 수 있습니다.

class ResNet(tf.keras.Model):

    def __init__(self):
        super(ResNet, self).__init__()
        self.block_1 = ResNetBlock()
        self.block_2 = ResNetBlock()
        self.global_pool = layers.GlobalAveragePooling2D()
        self.classifier = Dense(num_classes)

    def call(self, inputs):
        x = self.block_1(inputs)
        x = self.block_2(x)
        x = self.global_pool(x)
        return self.classifier(x)


resnet = ResNet()
dataset = ...
resnet.fit(dataset, epochs=10)
resnet.save_weights(filepath)


Putting it all together: an end-to-end example

지금까지 다음과 같은 내용을 보았습니다.

  • Layer__init__ or build에서 만들어진 상태를 캡슐화하고 call을 통한 계산을 행합니다. 
  • 더 새롭고 더 큰 계산 블록으로 만들어질 수 있습니다.
  • (regularization)losses에 접근할 수 있습니다.
  • 외부 컨테이너에 해당하는 Model로 학습시킬 수 있습니다.
  • ModelLayer을 override하고 있으나 학습과 serialization 측면에서 차이점을 가집니다.

여태까지 배운 모든 내용을 포함한 예제를 보겠습니다. MNIST를 학습시키는 Variational AutoEncoder예제입니다. VAE는 하위 클래스 계층의 중첩된 구성으로 구축된 모델의 하위 클래스입니다. 또한, regularization loss(KL divergence)에 대해서도 다룹니다.

(개념에 대한 부분은 넘어가도 좋습니다. VAE의 개념은 처음에 이해하기엔 어렵습니다. 하지만 코드가 어떤 구조를 가지고 있는지는 관찰하고 넘어가시는 것을 추천드립니다.)

class Sampling(layers.Layer):
  """Uses (z_mean, z_log_var) to sample z, the vector encoding a digit."""

  def call(self, inputs):
    z_mean, z_log_var = inputs
    batch = tf.shape(z_mean)[0]
    dim = tf.shape(z_mean)[1]
    epsilon = tf.keras.backend.random_normal(shape=(batch, dim))
    return z_mean + tf.exp(0.5 * z_log_var) * epsilon


class Encoder(layers.Layer):
  """Maps MNIST digits to a triplet (z_mean, z_log_var, z)."""

  def __init__(self,
               latent_dim=32,
               intermediate_dim=64,
               name='encoder',
               **kwargs):
    super(Encoder, self).__init__(name=name, **kwargs)
    self.dense_proj = layers.Dense(intermediate_dim, activation='relu')
    self.dense_mean = layers.Dense(latent_dim)
    self.dense_log_var = layers.Dense(latent_dim)
    self.sampling = Sampling()

  def call(self, inputs):
    x = self.dense_proj(inputs)
    z_mean = self.dense_mean(x)
    z_log_var = self.dense_log_var(x)
    z = self.sampling((z_mean, z_log_var))
    return z_mean, z_log_var, z


class Decoder(layers.Layer):
  """Converts z, the encoded digit vector, back into a readable digit."""

  def __init__(self,
               original_dim,
               intermediate_dim=64,
               name='decoder',
               **kwargs):
    super(Decoder, self).__init__(name=name, **kwargs)
    self.dense_proj = layers.Dense(intermediate_dim, activation='relu')
    self.dense_output = layers.Dense(original_dim, activation='sigmoid')

  def call(self, inputs):
    x = self.dense_proj(inputs)
    return self.dense_output(x)


class VariationalAutoEncoder(tf.keras.Model):
  """Combines the encoder and decoder into an end-to-end model for training."""

  def __init__(self,
               original_dim,
               intermediate_dim=64,
               latent_dim=32,
               name='autoencoder',
               **kwargs):
    super(VariationalAutoEncoder, self).__init__(name=name, **kwargs)
    self.original_dim = original_dim
    self.encoder = Encoder(latent_dim=latent_dim,
                           intermediate_dim=intermediate_dim)
    self.decoder = Decoder(original_dim, intermediate_dim=intermediate_dim)

  def call(self, inputs):
    z_mean, z_log_var, z = self.encoder(inputs)
    reconstructed = self.decoder(z)
    # Add KL divergence regularization loss.
    kl_loss = - 0.5 * tf.reduce_mean(
        z_log_var - tf.square(z_mean) - tf.exp(z_log_var) + 1)
    self.add_loss(kl_loss)
    return reconstructed


original_dim = 784
vae = VariationalAutoEncoder(original_dim, 64, 32)

optimizer = tf.keras.optimizers.Adam(learning_rate=1e-3)
mse_loss_fn = tf.keras.losses.MeanSquaredError()

loss_metric = tf.keras.metrics.Mean()

(x_train, _), _ = tf.keras.datasets.mnist.load_data()
x_train = x_train.reshape(60000, 784).astype('float32') / 255

train_dataset = tf.data.Dataset.from_tensor_slices(x_train)
train_dataset = train_dataset.shuffle(buffer_size=1024).batch(64)

# Iterate over epochs.
for epoch in range(3):
  print('Start of epoch %d' % (epoch,))

  # Iterate over the batches of the dataset.
  for step, x_batch_train in enumerate(train_dataset):
    with tf.GradientTape() as tape:
      reconstructed = vae(x_batch_train)
      # Compute reconstruction loss
      loss = mse_loss_fn(x_batch_train, reconstructed)
      loss += sum(vae.losses)  # Add KLD regularization loss

    grads = tape.gradient(loss, vae.trainable_variables)
    optimizer.apply_gradients(zip(grads, vae.trainable_variables))

    loss_metric(loss)

    if step % 100 == 0:
      print('step %s: mean loss = %s' % (step, loss_metric.result()))

VAE는 Model의 하위클래스이기 때문에 다음과 같이 학습시킬수도 있습니다.
(데이터가 model에 어떻게 흘러가는지도 잘 관찰하는게 좋습니다)

vae = VariationalAutoEncoder(784, 64, 32)

optimizer = tf.keras.optimizers.Adam(learning_rate=1e-3)

vae.compile(optimizer, loss=tf.keras.losses.MeanSquaredError())
vae.fit(x_train, x_train, epochs=3, batch_size=64)


Beyond object-oriented development: the Functional API

Functional API를 사용해서 구현할 수도 있습니다. 어떤 방식을 쓰던 문제가 되지 않습니다. 섞어 사용하여도 무방합니다.

original_dim = 784
intermediate_dim = 64
latent_dim = 32

# Define encoder model.
original_inputs = tf.keras.Input(shape=(original_dim,), name='encoder_input')
x = layers.Dense(intermediate_dim, activation='relu')(original_inputs)
z_mean = layers.Dense(latent_dim, name='z_mean')(x)
z_log_var = layers.Dense(latent_dim, name='z_log_var')(x)
z = Sampling()((z_mean, z_log_var))
encoder = tf.keras.Model(inputs=original_inputs, outputs=z, name='encoder')

# Define decoder model.
latent_inputs = tf.keras.Input(shape=(latent_dim,), name='z_sampling')
x = layers.Dense(intermediate_dim, activation='relu')(latent_inputs)
outputs = layers.Dense(original_dim, activation='sigmoid')(x)
decoder = tf.keras.Model(inputs=latent_inputs, outputs=outputs, name='decoder')

# Define VAE model.
outputs = decoder(z)
vae = tf.keras.Model(inputs=original_inputs, outputs=outputs, name='vae')

# Add KL divergence regularization loss.
kl_loss = - 0.5 * tf.reduce_mean(
    z_log_var - tf.square(z_mean) - tf.exp(z_log_var) + 1)
vae.add_loss(kl_loss)

# Train.
optimizer = tf.keras.optimizers.Adam(learning_rate=1e-3)
vae.compile(optimizer, loss=tf.keras.losses.MeanSquaredError())
vae.fit(x_train, x_train, epochs=3, batch_size=64)


이글은 다음 문서를 참조합니다.

www.tensorflow.org/guide/keras/custom_layers_and_models

(번역은 자력 + 파파고 + 구글 번역기를 사용하였으니, 부자연스럽더라도 양해바랍니다.)


Writing layers and models with Tensorflow Keras


The Layer class

Layers encapsulate a state (weights) and some computation

우리가 주로 작업할 데이터 구조는 layer입니다. 레이어는 상태(가중치)와 입력에서 출력으로의 변환을 동시에 캡슐화시킵니다.

예제를 살펴보겠습니다.

from tensorflow.keras import layers


class Linear(layers.Layer):

  def __init__(self, units=32, input_dim=32):
    super(Linear, self).__init__()
    w_init = tf.random_normal_initializer()
    self.w = tf.Variable(initial_value=w_init(shape=(input_dim, units),
                                              dtype='float32'),
                         trainable=True)
    b_init = tf.zeros_initializer()
    self.b = tf.Variable(initial_value=b_init(shape=(units,),
                                              dtype='float32'),
                         trainable=True)

  def call(self, inputs):
    return tf.matmul(inputs, self.w) + self.b

x = tf.ones((2, 2))
linear_layer = Linear(4, 2)
y = linear_layer(x)
print(y)
tf.Tensor(
[[ 0.04076247  0.12488913 -0.09827997 -0.00854541]
 [ 0.04076247  0.12488913 -0.09827997 -0.00854541]], shape=(2, 4), dtype=float32)

레이어 속성으로 설정된 경우 레이어별로 가중치 w와 b가 자동으로 추적된다는 점에 유의해야 합니다. (쉽게 말해서 그냥 레이어의 가중치와 bias에 접근할 수 있다.. 요정도?)

assert linear_layer.weights == [linear_layer.w, linear_layer.b]

add_weight를 사용하면 위의 예보다 코드도 짧고 더 빠릅니다.

class Linear(layers.Layer):

  def __init__(self, units=32, input_dim=32):
    super(Linear, self).__init__()
    self.w = self.add_weight(shape=(input_dim, units),
                             initializer='random_normal',
                             trainable=True)
    self.b = self.add_weight(shape=(units,),
                             initializer='zeros',
                             trainable=True)

  def call(self, inputs):
    return tf.matmul(inputs, self.w) + self.b

x = tf.ones((2, 2))
linear_layer = Linear(4, 2)
y = linear_layer(x)
print(y)


Layers can have non-trainable weights

layer는 학습가능한 가중치와 동시에 학습불가능한 가중치를 가질 수 있습니다. 이러한 가중치는 layer를 학습시킬 때 backprop을 진행하는 동안 학습 대상에서 고려되지 않습니다.

class ComputeSum(layers.Layer):

  def __init__(self, input_dim):
    super(ComputeSum, self).__init__()
    self.total = tf.Variable(initial_value=tf.zeros((input_dim,)),
                             trainable=False)

  def call(self, inputs):
    self.total.assign_add(tf.reduce_sum(inputs, axis=0))
    return self.total

x = tf.ones((2, 2))
my_sum = ComputeSum(2)
y = my_sum(x)
print(y.numpy())
y = my_sum(x)
print(y.numpy())

tf.Variable(~, trainable = False) 는 backprop을 진행하지 않겠다는 것입니다.

layer.weights에서 non-trainable weight로 카테고리화 되어 있습니다.

print('weights:', len(my_sum.weights))
print('non-trainable weights:', len(my_sum.non_trainable_weights))

# It's not included in the trainable weights:
print('trainable_weights:', my_sum.trainable_weights)


Best practice: deferring weight creation until the shape of the inputs is known

위의 로지스틱 회귀 예에서, Linear 클래스는 __init__에서 wb의 shape을 결정짓는 input_dim의 인자를 받습니다.

class Linear(layers.Layer):

  def __init__(self, units=32, input_dim=32):
      super(Linear, self).__init__()
      self.w = self.add_weight(shape=(input_dim, units),
                               initializer='random_normal',
                               trainable=True)
      self.b = self.add_weight(shape=(units,),
                               initializer='random_normal',
                               trainable=True)

많은 경우에, 우리는 입력의 크기를 미리 알지 못할 수 있으며, 그 값이 알려질 때, 어떤 때는 레이어를 인스턴스화한 후에서야 가중치를 만들 수도 있습니다.

Keras API에서 다음 예와 같이 build(inputs_shape)에서 layer weights를 만드는 것을 추천합니다.

class Linear(layers.Layer):

  def __init__(self, units=32):
    super(Linear, self).__init__()
    self.units = units

  def build(self, input_shape):
    self.w = self.add_weight(shape=(input_shape[-1], self.units),
                             initializer='random_normal',
                             trainable=True)
    self.b = self.add_weight(shape=(self.units,),
                             initializer='random_normal',
                             trainable=True)

  def call(self, inputs):
    return tf.matmul(inputs, self.w) + self.b

__call__은 자동으로 처음 불렸을 때 build를 실행시킵니다. 좀 더 사용하기가 쉬워졌습니다.

linear_layer = Linear(32)  # At instantiation, we don't know on what inputs this is going to get called
y = linear_layer(x)  # The layer's weights are created dynamically the first time the layer is called


Layers are recursively composable

계층 인스턴스를 다른 계층의 속성으로 할당하면 외부 계층이 내부 계층의 가중치를 사용할 수 있게 됩니다.

우리는 이러한 sublayer들을 __init__ method에서 사용하길 추천합니다(서브레이어는 build가 호출되면 사용될 것입니다)

# Let's assume we are reusing the Linear class
# with a `build` method that we defined above.

class MLPBlock(layers.Layer):

  def __init__(self):
    super(MLPBlock, self).__init__()
    self.linear_1 = Linear(32)
    self.linear_2 = Linear(32)
    self.linear_3 = Linear(1)

  def call(self, inputs):
    x = self.linear_1(inputs)
    x = tf.nn.relu(x)
    x = self.linear_2(x)
    x = tf.nn.relu(x)
    return self.linear_3(x)


mlp = MLPBlock()
y = mlp(tf.ones(shape=(3, 64)))  # The first call to the `mlp` will create the weights
print('weights:', len(mlp.weights))
print('trainable weights:', len(mlp.trainable_weights))


Layers recursively collect losses created during the forward pass

call method를 호출한 후에, 우리는 loss tensor를 다룰 수 있습니다.  이는 self.add_loss(value)를 통해 할 수 있습니다.

# A layer that creates an activity regularization loss
class ActivityRegularizationLayer(layers.Layer):

  def __init__(self, rate=1e-2):
    super(ActivityRegularizationLayer, self).__init__()
    self.rate = rate

  def call(self, inputs):
    self.add_loss(self.rate * tf.reduce_sum(inputs))
    return inputs


이 loss(내부 층에 의해 만들어져 포함된)는 layer.losses를 통해 접근할 수 있습니다. layer.losses는 항상 마지막 forward pass를 하는 동안에 계산된 loss값을 포함하고, 최상위층에서 모든 __call__의 시작부분에서 초기화됩니다.

class OuterLayer(layers.Layer):

  def __init__(self):
    super(OuterLayer, self).__init__()
    self.activity_reg = ActivityRegularizationLayer(1e-2)

  def call(self, inputs):
    return self.activity_reg(inputs)


layer = OuterLayer()
assert len(layer.losses) == 0  # No losses yet since the layer has never been called
_ = layer(tf.zeros(1, 1))
assert len(layer.losses) == 1  # We created one loss value

# `layer.losses` gets reset at the start of each __call__
_ = layer(tf.zeros(1, 1))
assert len(layer.losses) == 1  # This is the loss created during the call above

또한 손실 속성은 내부 layer의 가중치에 대해 생성된 regularization losses도 포함합니다.

class OuterLayer(layers.Layer):

  def __init__(self):
    super(OuterLayer, self).__init__()
    self.dense = layers.Dense(32, kernel_regularizer=tf.keras.regularizers.l2(1e-3))

  def call(self, inputs):
    return self.dense(inputs)


layer = OuterLayer()
_ = layer(tf.zeros((1, 1)))

# This is `1e-3 * sum(layer.dense.kernel)`,
# created by the `kernel_regularizer` above.
print(layer.losses)

이러한 losses는 다음 예와 같이 학습 loops동안에 계산되어집니다.

# Instantiate an optimizer.
optimizer = tf.keras.optimizers.SGD(learning_rate=1e-3)
loss_fn = keras.losses.SparseCategoricalCrossentropy(from_logits=True)

# Iterate over the batches of a dataset.
for x_batch_train, y_batch_train in train_dataset:
  with tf.GradientTape() as tape:
    logits = layer(x_batch_train)  # Logits for this minibatch
    # Loss value for this minibatch
    loss_value = loss_fn(y_batch_train, logits))
    # Add extra losses created during this forward pass:
    loss_value += sum(model.losses)

    grads = tape.gradient(loss_value, model.trainable_variables)
    optimizer.apply_gradients(zip(grads, model.trainable_variables))